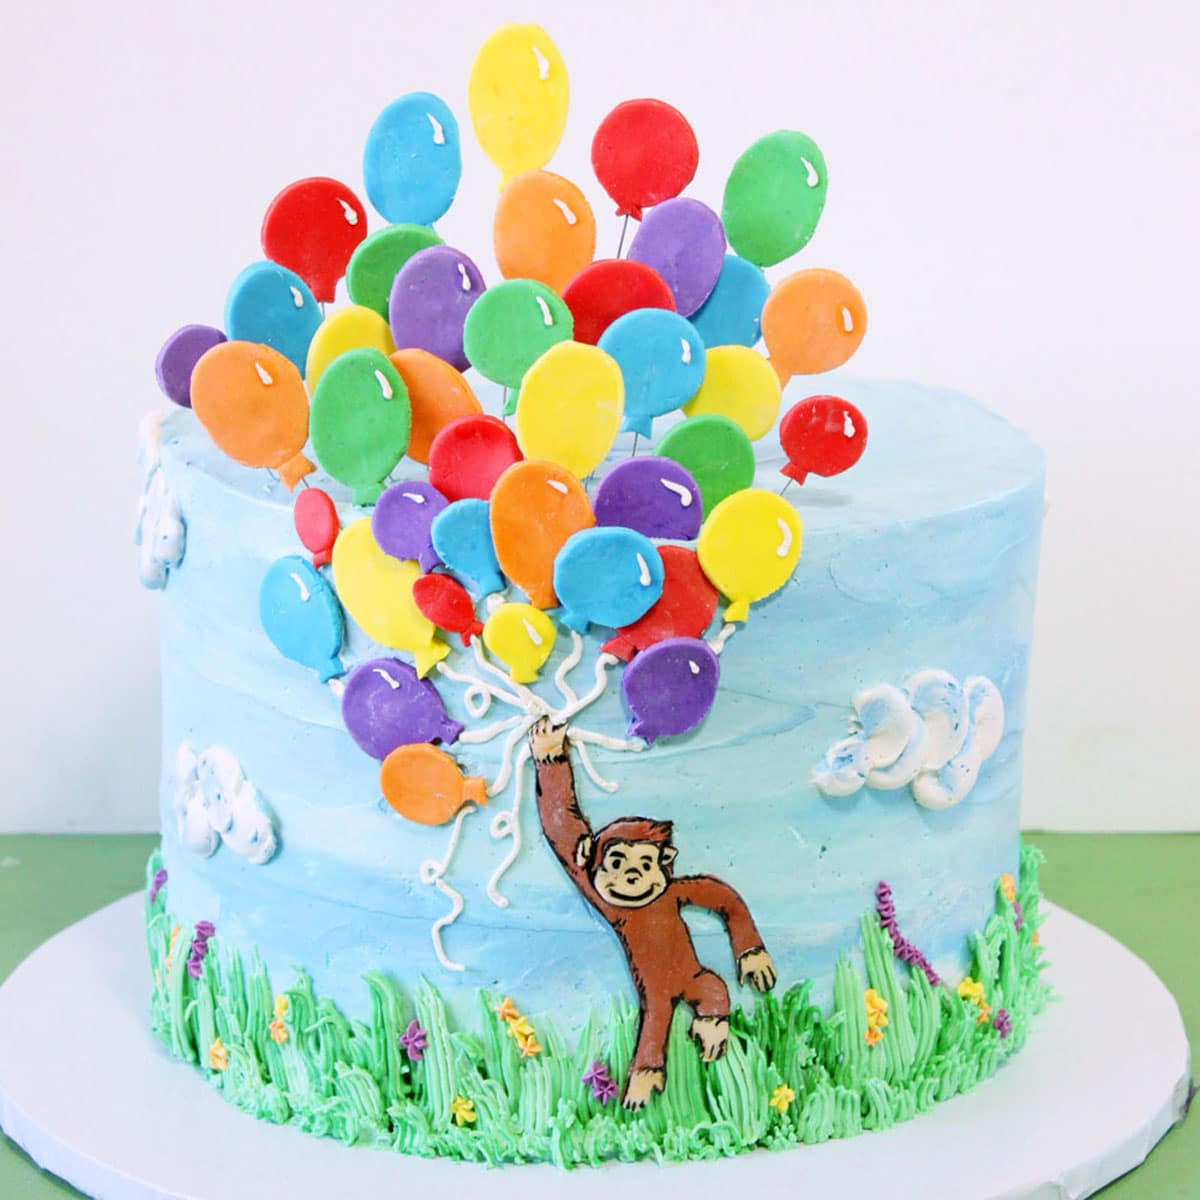
This Curious George Birthday Party Cake with thrill the little monkeys in your life! It features layers of chocolate cake sandwiched between layers of banana-white chocolate ganache, chocolate mousse filling, and hazelnut frosting.
You guys! I’m the mother of a 3-year old now. What the what?! My sweet boy went from a baby to a chubby-cheeked toddler to a long, lean man-child who talks a mile a minute and bounces off the walls and suddenly likes to tie up bad guys and joke about poop (the struggle is real, y’all). It’s been a wild ride and it’s only going to get crazier from here on out.
To celebrate 3 years of Asher, we threw him a Curious George birthday party a few weeks ago!
Asher is all about Curious George right now, which is fine with me. The animated cartoon is delightful and we love reading him the new books. (The older ones are a little creepy—he gets thrown in jail and/or punished by the police all the time. Child-rearing was pretty heavy-handed back then.) In years past we’ve done parties based on children’s books, but this year I wanted to let him choose the theme—so I was thrilled when he told me he wanted a Curious George party, since it fit right into our pattern. I’ll be posting more details about the party later on this week, but today it’s all about that cake. (…bout that cake, no trouble…)

My original plan was to do a roasted banana cake with chocolate-sour cream frosting. I mean, we’re talking about a monkey here—it HAD to be a banana cake, right? But when I ran the idea past Asher, he asked for a chocolate cake instead, so I flipped the plan, and made him a chocolate cake with layers of banana-white chocolate ganache, chocolate mousse filling, and hazelnut frosting. (I wanted to do peanut butter frosting, but allergies were a concern. I do think that this cake would be delicious with a peanut layer, though!)

The cake was a hit! The banana ganache layer isn’t overpowering—most people still recognized it as a banana flavor, but it wasn’t strong enough to offend people who don’t like banana, and it didn’t veer into artificial banana-candy territory. The hazelnut layer was so delicious, and the chocolate mousse brought a welcome level of deep, dark chocolate flavor for all the chocoholics we had at the party.

If you’re wondering how I served such a massive cake to children, I did it wedding cake-style. You can google specific directions, but basically I cut a ring in the center of the cake, about 6 inches across, then cut thin spokes out from the ring to the edge. I also cut the pieces in half horizontally so most people ended up with thin rectangular pieces, instead of the monster wedges pictured here. (Do as I say, not as I photograph…) It was a cool morning and so the cake was still slightly chilled, meaning it cut beautifully and held its shape throughout the process.

For the decorations, as always, I ended up assembling the cake late at night and sort of winging it. I had an idea of what I wanted it to look like, so I made the fondant balloons a few days in advance (which is necessary, so they have time to harden properly!) but the George character was made on the fly while consulting pictures on the internet. I always leave important stuff to the last minute and kick myself for it, because I do think he really could have benefited from more time and more finessing—my little fondant monkey is more George-adjacent than actually a good likeness. However, I’m trying out a new life motto that is basically “Nobody cares, stop being an obsessive freak” and that is helping me deal with unimportant things like a fondant monkey that’s not quite perfect.
George was given a lovely buttercream landscape to float through that included two-toned grass, lots of purple, yellow, and orange flowers, and big fluffy white-and-blue clouds.

As I mentioned, I made most of the balloons earlier in the week. They’re made out of homemade marshmallow fondant, and it takes about 2-3 days for them to be hard enough to safely stand upright on a cake. I used 20 gauge wire to stick them upright into the cake—it’s called “stem wire” and I found it in the florist section of Michael’s.

Here’s an action shot of the birthday boy (and the Man in the Yellow Hat!) about to blow out his candles. Game face on!

We had over 40 people (about 15 of them children) at the party, so this cake is a little larger than your average tiered birthday cake. It’s 10 inches wide and 5 layers of cake, and it easily fed our group with a bunch left over. I’ve tweaked the recipe a bit down below, to make a slightly more reasonable cake of only 4 layers, but if you’re feeding a smaller crowd you could consider halving it and baking it in 6- or 7-inch pans.
🎂 More Fun Party Cakes
- Circus Animal Cake
- Mini Banana Split Cakes
- Striped Buttercream Balloon Cake
- Watermelon Cake
- Unicorn Cakes
- Piñata Cake

Birthday Present Mini Cakes

Chocolate Cake With Banana and Hazelnut Filling
Ingredients
For the Chocolate Cake: – make this recipe TWO times
- 6 oz unsalted butter, at room temperature
- 4.75 oz granulated sugar, (2/3 cup)
- 5 oz brown sugar, (2/3 cup), packed
- 2 large eggs, at room temperature
- 2 tsp vanilla extract
- 8 fl oz buttermilk, (1 cup), at room temperature
- 4 oz sour cream, (1/2 cup), at room temperature
- 2 tbsp water , or brewed coffee
- 7.8 oz all-purpose flour, (1¾ cups)
- 3 oz unsweetened cocoa powder, (1 cup), sifted
- 1½ tsp baking soda
- ½ tsp salt
For the Hazelnut Frosting:
- 9 oz hazelnuts, (2 cups), skinned
- 4 oz powdered sugar, (1 cup)
- 2.5 oz unsalted butter, (5 tbsp), at room temperature
- 1 tsp vanilla extract
- 1/4 tsp salt
- 2-4 tbsp heavy cream
For the Vanilla Buttercream: – make this recipe TWO times if you want plenty of frosting for decorating
- 9 large egg whites
- 14 oz granulated sugar, (2 cups)
- 1 lb unsalted butter, soft but still cool
- 2 tsp vanilla bean paste , or 1 tbsp vanilla extract
- 1/4 tsp salt
For the Banana Ganache:
- 18 oz white chocolate chips , (3 cups), or chopped white chocolate bars
- 1 banana, medium, very ripe
- 1 1/2 cups heavy cream, divided use
- 1– 1 ½ tsp banana extract , or flavoring, optional but recommended
- 2 tsp unflavored powdered gelatin
- 2 tbsp water
Instructions
To Make the Chocolate Cake:
- Line two 10×2-inch cake pan with parchment, and spray them with nonstick cooking spray. (9-inch pans can be substituted but will take a little longer to cook through.) Preheat the oven to 350 F.
- Add the butter and both sugars to the bowl of a large stand mixer fitted with a paddle attachment. Beat them together on medium-high speed, until light and fluffy, about 5 minutes. Add the eggs one at a time, beating well after each addition. Add the vanilla extract and mix it in.
- In a separate bowl, whisk together the buttermilk, sour cream, and water (or coffee, if using). In a different bowl, sift together the flour, cocoa powder, baking soda, and salt. With the mixer running on low, add a quarter of the sifted flour mixture. When the flour streaks have almost all disappeared, add a third of the liquid to the mixing bowl. When that’s incorporated, continue to add the drys and wets in an alternating pattern, ending with the dry ingredients.
- When the dry ingredients are nearly incorporated, stop the mixer. Scrape down the bottom and sides of the bowl with a rubber spatula, and finish mixing the cake by hand. Pour the batter into the prepared pans and smooth it into an even layer. Bake the cakes for 16-18 minutes, until a toothpick inserted into the center comes out with just a few moist crumbs attached. Cool the cakes in the pans for 10 minutes, then flip them out on a wire rack and let them cool completely. Repeat a second time so that you have 4 cake layers.
- The cakes can be made several days in advance and kept, well-wrapped and refrigerated or frozen, until ready to use.
To Make the Hazelnut Frosting:
- Preheat the oven to 350 F. Spread the hazelnuts out on a baking sheet and roast them in the oven for about 7-10 minutes, stirring several times during the process so they get evenly toasted. Stop when they’re fragrant and golden brown.
- Transfer the hot nuts to a food processor and process at full speed until they are a smooth paste, scraping down the sides of the processor when necessary. Let the hazelnut paste cool to room temperature.
- Place the hazelnut paste, powdered sugar, butter, vanilla, and salt in the bowl of an electric mixer fitted with a paddle attachment. Mix on medium-low speed until creamy, scraping down the bowl with a rubber spatula as you work. Add 2 tablespoons of cream and beat on medium-high speed until the mixture is light and smooth. Add more cream if necessary, to get a light and smooth texture. The hazelnut frosting can be made in advance and kept in an airtight container in the refrigerator until you’re ready to use it.
To Make the Vanilla Buttercream:
- Combine the egg whites and the granulated sugar in the bowl of a large stand mixer, and whisk them together. Choose a small saucepan that lets you fit the base of the stand mixer snugly into the top of the saucepan—this is your makeshift hot water bath. (Alternately, you can use a different bowl or an actual bain marie and then transfer the mixture to a mixing bowl once it’s heated.) Add an inch of water to the bottom of the saucepan, and bring the water to a simmer.
- Place the mixing bowl on top of the saucepan, making sure that the bottom isn’t in contact with the water, and heat the egg white mixture. Whisk frequently so that the egg whites don’t cook. Continue to heat the whites until they are hot to the touch, and when you rub a bit between your fingers, you don’t feel any grittiness from the sugar. Once the whites are hot, transfer the mixing bowl to your mixer and fit it with a whisk attachment.
- Beat the whites on medium-high speed until they are a shiny, stiff, voluminous meringue, and are no longer warm to the touch—feel the outside of the bowl, and make sure that it is around room temperature. Depending on your mixer and the temperature of your environment, this may take 15-20 minutes, or more. Reduce the speed to medium-low and add the softened but cool butter in small chunks, a tablespoon at a time, making sure to wait in between additions. It may separate or look a little gloopy at this point—fear not. Once all of the butter is added, increase the speed again and whip until it comes together and is light and fluffy. If, after 5 minutes, it hasn’t come together, refrigerate the mixing bowl for 5-7 minutes, to cool the mixture down, and whip it again until it has thickened and is smooth and silky. Add the vanilla extract and salt.
- The buttercream can be made in advance and kept at room temperature if you’re going to use it the same day, or refrigerated. If it has been chilled, let it sit at room temperature until completely soft, then re-whip it to get the smooth texture back before you use it. Before use, divide it and tint it to whatever colors you desire.
To Make the Banana Ganache:
- Place 1/2 cup of heavy cream in a small saucepan over medium heat. Heat it until it simmers and small bubbles form all along the edges of the pan, but do not allow it to come to a full boil.
- While the cream is heating, prepare the white chocolate and banana mixture. If you have a food processor, place the half banana in the food processor and mix until the banana has liquefied.
- Add the white chocolate chips to the banana and process until the white chocolate is in small pieces.
- The mixture will clump together, so stop the processor several times to scrape it down. Once the cream is simmering, with the processor on, carefully pour the hot cream in a small stream down into the bowl of the processor and let it run until the white chocolate has melted and the ganache is smooth and free of lumps.
- If you do not have a food processor, this can be done in a mixer, or you can mash the banana by hand and add very finely chopped white chocolate to it, stirring until well combined. Pour the hot cream over the white chocolate-banana mixture and whisk it until it is smooth. This method produces a ganache that tastes the same, but there might be small pieces of banana that are not incorporated.
- Once everything is smooth, scrape the ganache into a bowl and whisk in 1 tsp of banana extract. Taste the mixture, and add more extract if desired, to get a strong banana flavor. At this point, you can pause, press a layer of cling wrap on top of the ganache, and leave it on the counter for several days before proceeding.
- When you’re ready to assemble the cake, whisk together the gelatin and cold water in a small bowl. Let it sit for 10 minutes so that the gelatin absorbs the water. Microwave the bowl for 15-20 seconds, until the gelatin is liquefied. Microwave the banana ganache in 20-second increments, whisking after every 20 seconds, until it has softened and is the texture of peanut butter.
- Beat the remaining 1 cup of heavy cream in a mixer until it holds medium peaks—it should be pillowy like shaving cream, not be curdled or crumbly. Whisk the melted gelatin into the softened ganache, then fold in the whipped cream in 2-3 batches, gently stirring so as not to deflate the cream. The banana mixture will start to set after a time, thanks to the gelatin, so it’s important to start assembling the cake right after you add the gelatin and whipped cream.
To Assemble:
- If necessary, trim the tops of the cakes so that they’re level. Place some vanilla frosting in a piping bag fitted with a coupler or 1/2-inch round tip. Place one cake round on a 10-inch cardboard cake circle, and pipe a circle of frosting around the outer edge of the cake. Spread half of the banana ganache on the cake, smoothing it into an even layer inside the buttercream circle.
- Place a second cake round on top, and pipe a frosting ring around the cake layer. Scrape the hazelnut frosting onto the cake, and spread it into an even layer. Repeat this process with a third cake layer, topping this one with the remaining banana ganache. Finally, place the last cake round on top, press down gently, and make sure the sides of the cake are straight. Spread a very thin layer of frosting on the sides and top of the cake—just enough to trap any stray crumbs. Refrigerate the cake for an hour, to set the fillings and firm up the buttercream.
- After an hour, decorate the cake with the remaining frosting in the pattern of your choice. The cake can be stored in the refrigerator for several days, but for the best taste and texture, allow it to come to room temperature before serving.
Recipe Notes
Measuring Tips
Our recipes are developed using weight measurements, and we highly recommend using a kitchen scale for baking whenever possible. However, if you prefer to use cups, volume measurements are provided as well. PLEASE NOTE: the adage “8 oz = 1 cup” is NOT true when speaking about weight, so don’t be concerned if the measurements don’t fit this formula.
Want to learn more about baking measurements and conversion?
Nutrition
Fondant Balloons
Ingredients
- 8 oz white fondant, I like using homemade marshmallow fondant
- Assorted gel food coloring, I like Americolor brand
- Powdered sugar
- Balloon cookie cutters, oval or round cookie cutters would also work
- Wire, I used 20 gauge stem wire from the floral section of a craft store
Instructions
- Dust your work surface with powdered sugar. If you have plastic food-safe gloves, now is a good time to wear them, so that your hands won’t get food coloring on them.
- Divide the fondant into the number of colors that you desire. Press one piece into a disc, and put a few drops of gel food coloring in the center. Fold the sides over the coloring, so you have a fondant ball, and knead it between your hands. Soon you’ll start seeing streaks of color come through the fondant. Continue to knead until the fondant is a uniform color. Add more food coloring if necessary, until you get a bright yellow. If at any time the fondant gets too sticky, dust your hands with powdered sugar. Repeat with the rest of the fondant balls until you have all the colors you want. Wrap the fondant you’re not using in plastic wrap.
- Roll out a ball of fondant until it’s about 1/8-inch thick. Cut out shapes with your cookie cutters. Snip the wire into the lengths you desire—remember, you’ll want to give yourself plenty of room to stick them deep into the cake for stability!
- Gently poke a wire into the side of a balloon, taking care not to angle it so it breaks through the fondant. Stick it deep into the balloon. Place the wired balloon on a baking sheet very lightly dusted with powdered sugar. Repeat until you have all the balloons you need, making a few extras in case of breakage.
- Let the balloons sit at room temperature so the fondant hardens, for at least 2-3 days (longer is great!).
Measuring Tips
Our recipes are developed using weight measurements, and we highly recommend using a kitchen scale for baking whenever possible. However, if you prefer to use cups, volume measurements are provided as well. PLEASE NOTE: the adage “8 oz = 1 cup” is NOT true when speaking about weight, so don’t be concerned if the measurements don’t fit this formula.
Want to learn more about baking measurements and conversion?


Happy birthday to your son!! He is a lucky duck with that cake 😀
Beautiful cake for a lovely little boy.
You’re so talented! This looks great!
I believe we’ve discussed our little guys’ equal obsession with this quirky little monkey! And your execution is unmatched as always. You always say that you throw these things together at the last minute (maybe not your marshmallow fondant balloons, but I think the Hungry Little Caterpillar cake was done the night before the party??) but you must be one of those people who creates miracles under pressure. Calvin cannot seem to get into cake so we went with a chocolate chip cookie cake. And what I cannot deliver in quality, I make up for in quantity. He got 3 birthday parties but none had a homemade cake. 🙂 Happy Birthday Asher!!! Let’s all make it through Year 3, I hear they become Tiny Adults at age 4. #sketpical
Girl, you are so crazy talented! I seriously love coming here to see your latest creation, and you never disappoint. Now you have ME wanting a Curious George cake, and trust me, my sistah, I am waaaaaaaaaay past 3 years old. 🙂
I love love love this cake! You have such mad skills! Always and forever impressed!
Wow, that cake is absolutely perfect- it looks like it was made in a bakery! I would love to have a cake like that made for my son’s birthday. He isn’t a fan of Curious George, but I could have another design or something on the border of the cake. I don’t think I could do this on my own, though- I’ll just find a professional to make it for me.
Girl. I never thought I’d be saying this to someone: Your fondant monkey is fiiiine. Excellent, even!
I also realized that wedding-style is how my grandmother always cut cakes! I’d completely forgotten about it. Hers were more wide than tall, but yeah, you end up with far more manageable pieces that way.
Lastly, that cake looks perfect. So soft and fluffy–and I want to dig into that banana ganache real bad.
Lastly for realsies, HAPPY BIRTHDAY ASHER! Gosh. Time flies, and he’s growing up to be clearly awesome. Poop jokes are a classic.
Oh, I’ll bet you say that to all the girls! (But thank you just the same.) And I KNOW, he is so old! He’s completely a real person now, and every time he comes up with an original joke or tells a long imaginative story, it blows my mind. Thanks D!
Asher is one lucky kid to have a mom who makes him such cool cakes! I JUST saw your very hungry caterpillar cake and I was blown away. I love the details on this cake and the fact that it has four flavors of filling just takes it over the top. Happy belated birthday to him! 🙂
Thank you, Giselle! Making stuff for the family (as opposed to just for the blog) is so much more meaningful–and watching his eyes light up when he saw it was so fun. 🙂
How long (many days) can you safely leave this cake in the fridge before serving. I am going to try this out, but decorate it with LMF fondant. It looks great!